1957 Corvette RestoMod Story – Page 8
C4 Rear-End Disassembly
My father taught me many things, and one was that any job is easier if you have the right tools. So despite my limited budget for this project, I had to break down and buy two new tools. One was expensive, and the other not so much – but boy did they help me a bunch.
On page 5 of this story, I told you how I removed the front leaf spring without the use of a special tool for that process. Well, the spring compression tool finally arrived and was an expensive purchase.
And after paying a local shop to press in and out my new lower ball joints, I decided that additional “pressing” jobs needed my own hydraulic press.
On this page, we explore the disassembly of the C4 rear-end.
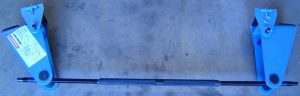
At right is the J-33432 tool I used to compress the leaf spring. This allows you to safely remove the spring bolt nut, then de-compress the spring easily.
I bought this tool new from HandsOn Tools online. It took 3 months on backorder to get it – but it was worth it.
I tried to buy a used one on Ebay but was outbid at the last second. Word to the wise: If you really want something, let Ebay do automatic bidding for you.
I am taking all of the suspension and steering apart to replace the pieces that have worn out – and to upgrade them. Remember, this is a 14-year old rear-end assembly.
From the outside-in, it contains: rotors, calipers, pads, hub, knuckle, axle shafts, u-joints, tie rods, spindle rods, control rods, and differential carrier. The rotors will be replaced with slotted and drilled new ones from Summit Racing, the pads obviously replaced; u-joints definitely wear out (and that’s one reason I needed the shop press); and all bushings will be replaced with red polyurethane pieces from Energy Suspension.
And remember the Dana 36 carrier? That will be upgraded with gearing going from the stock 3.07, to 3.54 – and all new bearings & seals.
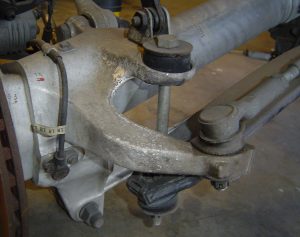
Above is the spring bolt, spring, tie-rod end and spindle knuckle. The long spring bolt attaches to the spring using bushings and washers. The bolt passes through the spindle at the top. Along with separate axle shafts, this makes up the independent rear suspension – which is nice!
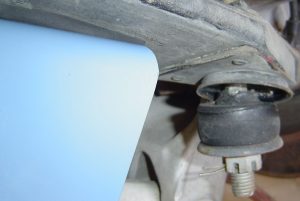
Picture above is the lower spring bolt and spring end when the spring is compressed. You can see it’s easy to remove the cotter pin and castle nut now that pressure is relieved from the spring. Before compressing the spring, I removed the sway bar. It had no load on it and was in the way.
Below is the J-33432 Kent-Moore spring compression tool attached to the rear spring. It’s easy to install and use – no wonder it’s so expensive.
The tool pushes the ends of the spring upward, compressing it. From there it’s easy to remove the lower spring nut.
Then the tool can be backed off slowly until there is no more energy in it. From there, the center mount of the spring can be detached from the carrier cover.
I need to use the J-33432 again on the front as well when I test fit the entire chassis – after upgrading all the suspension pieces of course.
After the spring, I removed the tie-rod assembly. This is mounted on the top rear of the carrier cover, and the tie-rod ends are attached to the spindle knuckle.
I used my trusty PowerBuilt tie-rod puller on the right spindle connection, but the left one just fell out. Do you think it needed replacing?
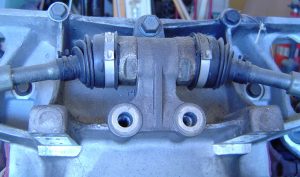
The middle photo is the mounting point of the tie-rod assembly. This old one will be scrapped since it has seen better days.
The mount is fastened with three bolts that thread into the carrier cover. Interestingly, this cover also has mounting points for the transverse leaf spring. These can be seen just below the arms of the tie-rods in the middle photo.
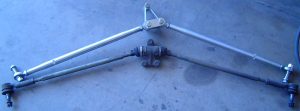
The new and old tie-rod assembly is the lower right photo. The new one (top, as if you couldn’t tell) was bought from Newman Car Creations when they re-engineered by stock frame. The new one is adjustable and will mount from under the spindle. This location, along with longer spring bolts will lower the rear of the car between one and two inches.
This part was easy, but still take plenty of photos and notes. Or, just buy my Chapter 6 and you won’t need to!
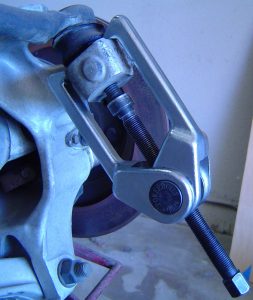
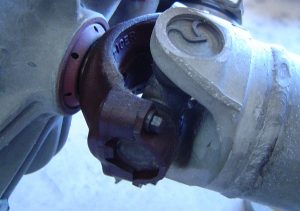
Pictured right is the inner right axle shaft yoke and U-joint. The U-joint is pressed into the shaft yoke, and is held in the stub axle yoke by bolted steel straps. If this comes apart while you’re driving – bad news. That’s why the strap bolts are very tight and were installed with Threadlocker liquid.
Needless to say, they were a bear to loosen – especially since I could only use a 1/4-inch ratchet drive. A breaker bar ratchet would have been better – Oh well!
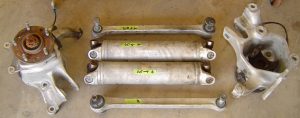
At right are both hubs/spindles, axle shafts, and spindle rods. I marked the location and direction of each piece with green tape and marker. Before I attempt to separate the hub from the spindle knuckle, I’ll check the hub for runout. If it’s okay, no further disassembly is required.
This “pumpkin” will have new ring & pinion gears, bearings, cups and seals installed. I was originally going to do this work myself – but I’m not sure now. Read on, I just may be stubborn enough to do it.
It took about 4 hours to get to this point. Of course I was taking photos and keeping copious notes too.
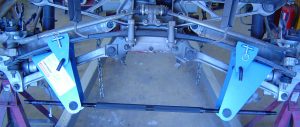
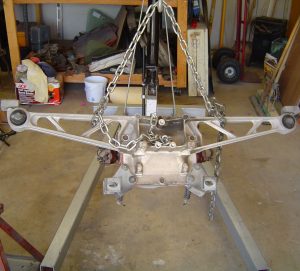
At left you can see the partial frame has been removed (remove the upper shock plates first). The C4 has a rear carrier cover that includes mounting bars and eyelets (sometimes called the “batwing”).
At the ends of each bar are eyelets with bushings (black, round) that will be replaced with my new polyurethane ones from Energy Suspension.