1957 Corvette RestoMod Story – Page 15
Rebuild the Dana 36 Differential
The Dana 36 uses a limited-slip differential (LSD). Called the “case”, the LSD transfers power to both wheels equally – except during turning. Inside the case are spider and side gears, and clutch packs. The clutches are what meter the distributed power to each wheel correctly.
When turning, the outside wheel must turn faster than the inside wheel. The LSD makes sure power is to both wheels in the correct proportions.
So I needed to disassemble the case to see if any of the gears or clutch packs were worn or damaged. Read on, this gets good…
As page 14 of this story noted, my ring & pinion will be replaced with 3.54 ratio gearing. The ratio is calculated by dividing the number of pinion teeth into the number of ring gear teeth.
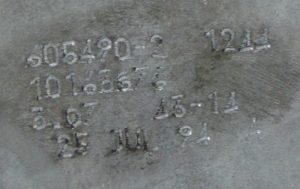
At right are etchings on my Dana 36 carrier. The third row of numbers indicates the gear ratio (3.07), and then the ring and pinion teeth (43-14).
The last row is the build date for my Dana 36. You can see that is was definitely built for the 1995 production year.
I bought my new ring & pinion gears from Just Differentials and made by U.S. Gear. I did not want to buy imported gears because of the horror stories about steel quality. There are many other online sites, including Ebay. Also try Jeep product sites – Jeeps use Dana axles.

The first step is to remove the ring gear from the case. The bolts are torqued firmly, and they have threadlock on them so they won’t back out – so I used my 3/4-inch impact wrench to loosen ONLY.
Then I used my hand ratchet to back the bolts all the way out. Don’t act like NASCAR – if you gall the bolts you have to buy new ones, and they aren’t at your hardware store.
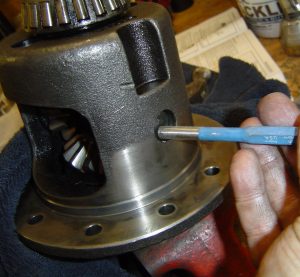
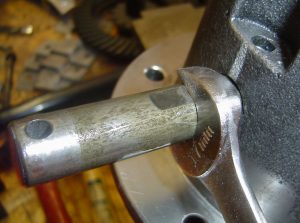
Next, remove the lock pin and center shaft (in that order) using a punch and hammer (above).
The center shaft will be re-used, but the lock pin can be replaced with a kit.
Be aware of the white line that is drawn down the case housing and center shaft. This line will be used again to line up the lock pin hole on re-assembly.
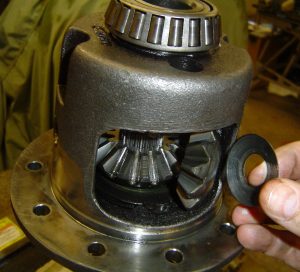
Once the center shaft is out, I used an round pry bar to turn the case while the spider gears were held in place by a stub axle in my vise.
The photo above shows how the side gears and thrust washer come out of the case.
It takes quite a bit of effort to turn the case housing with the pry bar, so make sure the assembly is securely tight in the vise.

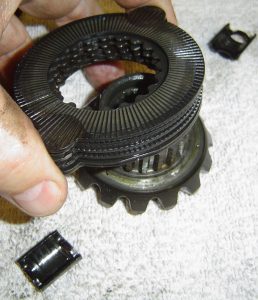
The spider gears and clutch packs come out once the side gears are removed (left). The clutch packs are a stack of grooved plates (right).
These grooves counteract each other when the car turns to allow only the correct amount of wheel spin.
Splines hold the clutches on the spider gears, and these splines also contact the stub axle splines. Just Differentials also sells the correct clutch packs for the Dana 36.
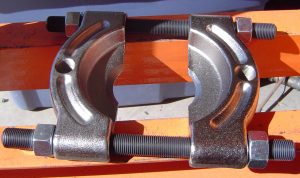
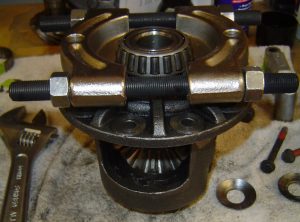
The case bearings and cups are bolted to the carrier using bearing caps. Two mandatory tools are used to remove these and other bearings: A shop press and a bearing splitter. At right is the OTC 1123 bearing splitter.
Below right, you see the splitter clamps the bottom of the bearing. Then the splitter’s perimeter is supported on the press, and the press pushes down on the bearing seat until it pops off – quite a bit of pressure needed.
OTC/SPX makes many of the specialty tools used on GM vehicles – but whoa! are they expensive.
The 1123 was bought from S&J Tools online for about $75 – and I was lucky to get it at that price.
Chapter 10 of my book explains in detail how to set up the press and use the splitter. I also explain how to re-assemble the differential – and it’s not as easy as it sounds.
Once all re-used and new parts are lubricated, time to rebuild the differential.
At left, new clutch packs are installed. The bottom packs are under the lower spider gear inside the case.
I came up with a unique way to keep the upper clutch packs and spider gear in place while the side gears were inserted – and it’s all in Chapter 10.
And I used hardware I already owned!
The center shaft is almost back in the case (right). Note the white line on the case housing – the end of the center shaft has one too. This was put there by the factory to align the lock pin hole in the shaft with the hole in the case. After the center shaft is pounded in, a lock pin is pushed in these holes to keep the center shaft from coming out.
The wrench in this photo is holding on to the center shaft by way of two flat sides of the shaft. This allows you to turn the shaft to line up the white lines.
Make sure the case is secured in a bench vise before hammering in the center shaft and lock pin.
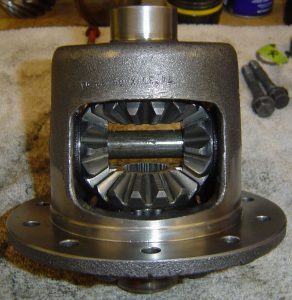
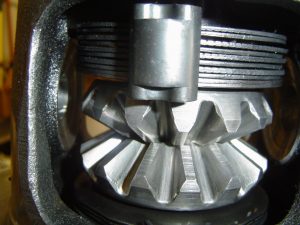
Here’s the completed differential. The thrust washers fit between the side gears and the case housing – and they are a bear to get re-installed. Chapter 10 of my book reveals all the tools and methods to make this scary rebuild easy.
Pressing on new bearings, setting up the backlash, pinion depth, and rotating torque, I used the minimum tools required. I used many sources of information, and when that didn’t work, I used common sense.
And my book has all the details.