1957 Corvette RestoMod Story – Page 12
C4 Rear Brakes Disassembly
Rear brakes on the C4 have an integrated e-brake system. Unlike other vehicles though, they do not have a drum and shoe type setup where the drum is sometimes built into the rotor hat. In the drum setup, the rotor hat is larger and has small brake shoes (not pads) that press out against the inside of the rotor hat.
On the C4, the e-brake employs a lever and spring setup – it uses the existing pads to clamp the rotor. It’s a pretty cool setup, so let’s explore how to take it apart.
See Chapter 7 of my book for all the details on disassembly and rebuilding C4 rear brakes.
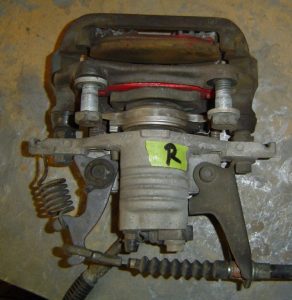
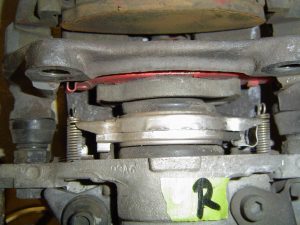
Left, is the right rear brake assembly. The e-brake cable is held by a bracket (lower right) and the cable ends at the lever (lower left). The bracket provides a solid base to pull the cable and engage the e-brake.
The caliper is a single piston and has lubricated slide pins. Most braking happens up front, so these single piston calipers will be plenty of force to stop the car.
The caliper and caliper bracket are attached by use of the slide pins and bolts. The slide pins allow the caliper to move, or slide, so the outside pad contacts the rotor. It’s a pinching action that clamps the pads on both sides of the brake rotor.
The caliper bracket bolts were put back in the mounting holes to ensure they were not lost after disassembly. You can see where the rotor would be – just above the caliper bracket bolts in the photo.
The entire brake assembly needs to be taken apart, tagged for location, and restored. The slide pin dust boots will be replaced, the e-brake bracket, lever, and spring sandblasted and painted, as well as, the caliper bracket itself.
The caliper is rebuilt too with new seals and boots. And a new set of brake pads will round out the rebuild. First, let’s review the disassembly…
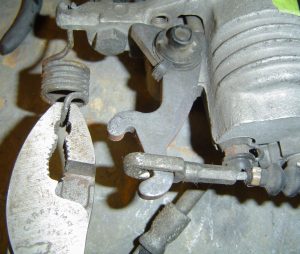
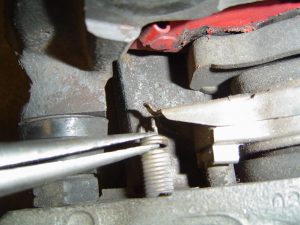
Above, you see the e-brake cable and its removal from the lever. You don’t have to remove the spring first, just bend the cable slightly to unhook its eyelet from the lever. Note the dust cap covering the bleeder.
Just left of the bleeder is the brake hose banjo bolt. This is where pressurized brake fluid enters the caliper. Make sure you cover this hole, or use a rubber stopper to prevent any debris from entering this hole. You can seriously damage the caliper if this happens.
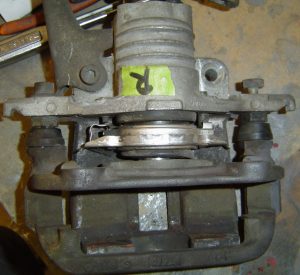
At lower left is the lever fulcrum with a small pushrod that extends through the caliper wall and meets the collar (shiny silver piece). When the e-brake is applied, the collar and piston are “mechanically” pushed out so the inner pad contacts the rotor.
At left, you can see how the inner pad can contact the rotor. As more e-brake force is applied, the caliper moves along its slide pins (far left & far right in photo) until the outer pad contacts the rotor. With the correct calibration and force, the caliper piston is pushed into place with a firm grip on the rotor. The result is the car’s rear brakes are locked.
When the e-brake is released, the two small springs on either side of the collar retract the piston and collar and relieve the pads on the rotor. Easy-peezy, lemon squeezy!
After removal of the e-brake cable, I also unhooked the two small collar springs (right). I left them in their holes for now.
The brake hose came off next, and I put the bolt back in the caliper hole to prevent brake fluid from draining out (or you could just drain the fluid).
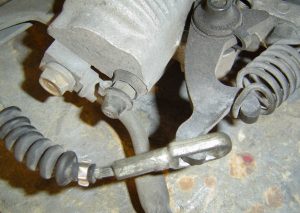
Now you can remove the lever spring and lever. The spring has high tension so make sure you have a good grip on the pliers.
The lever bolt goes through the caliper and is fastened with a nut on the top side.
Pictured above right is the one of the collar springs. Note that the spring attaches to the collar’s tab a couple of rings below the end of the spring – more tension.
The pushrod can also be seen just to the right of the collar spring.
Below right is the removed e-brake lever. The notch facing the camera is where the pushrod fits. A dust cap covers the bolt end.
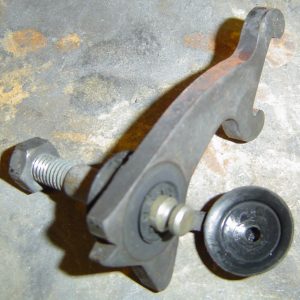
The caliper bracket, seen right, houses the slide pins and dust boots. The pins are hollow to allow bolts to be fastened to them through the caliper. The bracket bolt at right is a hex-head metric, while the left bolt is a metric Allen head. A second Allen head bolt holds the bracket from the bottom (next to the green tape).
Not realizing the Allen heads could be either metric or SAE, I stripped the left Allen head – sheeesh!
But after the clever use of my bench vise, the bolt was eventually removed. Don’t worry about assembly though, Rock Auto or just a hardware store has replacement bolts.
The next time you see these brakes, all components will be refurbished. Wrap the piston in a clean rag and stuff another one in the piston bore for protection.
The caliper bodies will be treated to high-temp black paint to accent the look I want for the car.
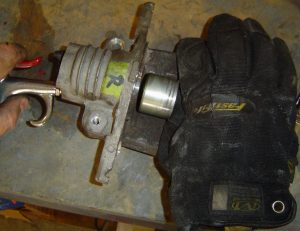
With everything removed, including the piston collar and plunger, use compressed air to push out the piston.
At left, make sure you have a soft material at the opening of the bore before blowing out the piston. It will shoot out the bore with some force. I used some old mechanics gloves, and no, my hands were not inside them.
Take great caution not to scratch or damage the caliper pistons or bores. They must have very tight tolerances in order to properly handle the high pressure of the brake fluid.