1957 Corvette RestoMod Story – Page 11
C4 Front Brake Rebuild, Part 2
Part 1 of our 1996 Grand Sport brake rebuild showed you how to prep the caliper pistons and bores, and then install the seals and piston boots.
Now that the calipers have been sandblasted and cleaned, they will be painted black just like the original Grand Sport calipers. I used high-temp paint from Eastwood – but also added a personal touch, so read on to find out. Better yet, buy Chapter 4 of my book to see all the rebuild details.
On this page we continue the front brake rebuild by installing new brake pads with new spring clips. Then we assemble the calipers and wrap them in a clean towel for safe storage until we need them.
Okay, let’s rebuild some calipers!
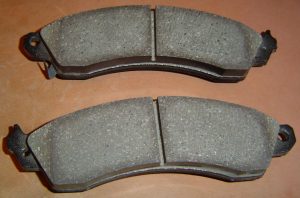
At right are my new brake pads from Raybestos. I bought these online from Rock Auto . These “ceramic” pads have two benefits: heat reduction and brake dust minimization. Less heat also helps brake noise. In the box, you may think they are ready to install – but they’re not. First we need to install new spring clips.
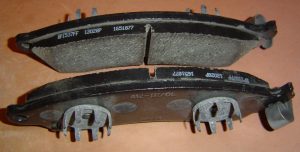
At right, the new spring clips are attached. I used the old pads as a guide. Note the pronged plates fastened to the back of the pads. These prongs fit inside the caliper for the outer pad, and inside the pistons for the inner pad. Which goes where you ask? Read on…
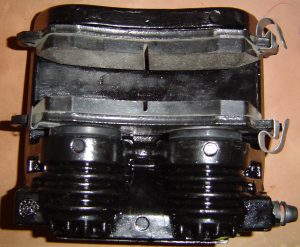
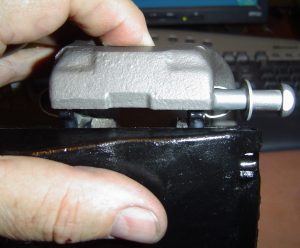
Bottom view of the caliper
At left, you can see the outer pad is partially installed in the caliper. Later on this page you’ll see that the bracket fits over the bottom of the caliper (the open end), and has notches at both ends to hold the pads in place.
The spring clip, seen at the left end of the pad, applies outward pressure on the caliper bracket, which holds the pads in place.
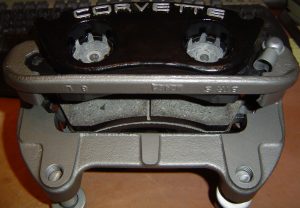
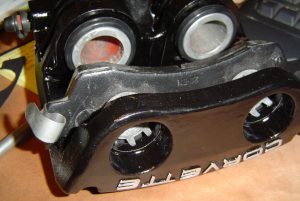
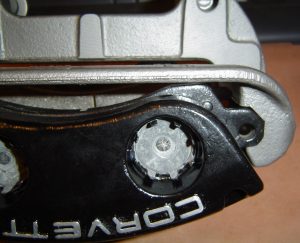
Note the CORVETTE script on the caliper face. This was lightly sanded and buffed to a brilliant shine – after all, these calipers will be seen through my wheels.
Below, the brake pad has a notched end, and a wear tab indicator. The tab is only on the inner pads and as the pad material wears down over time, the tab contacts the rotor to create a metal-on-metal screech.
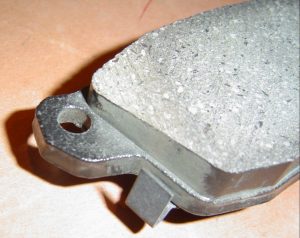
That’s when you know your pads are getting too thin and need replacement. The screech only happens when you are NOT braking.
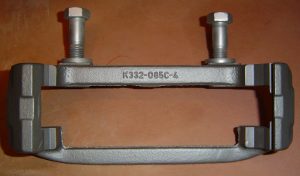
Above is the left caliper bracket. It holds the caliper in place and is bolted to the steering knuckle – tightly.
The notches at either end are designed to hold the bracket to the pads – and ultimately the caliper too.
I cleaned and painted the brackets with high-temperature paint from Eastwood – look good don’t they?
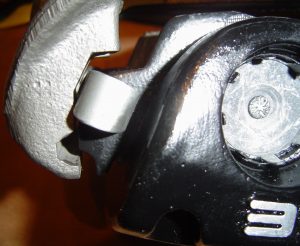
At left is the caliper with both pads installed. Note that both spring clips are on the same side.
Tremendous heat is generated by braking.
When you step on the brake pedal, brake fluid is under high pressure. This hydraulic pressure is pushed into the caliper bores where the pistons are pushed outward.
The pistons push the inner pad to contact the rotor, then the caliper slides for the rotor to contact the outer pad – and wonder of wonders, the car stops.
Pictured below and right are two different views of the caliper bracket when correctly installed.
The notches I wrote about earlier are clearly surrounding the ends of the brake pad.
When on the car, this notch setup makes changing pads a breeze!
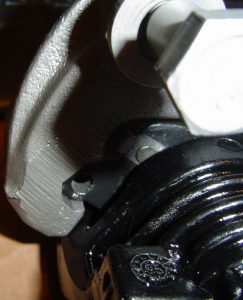
Below, a guide pin is inserted through the caliper bracket. It is secured at the other end by a small E-clip. Yep, that’s the only thing holding the caliper to the bracket!
The pad’s spring clips on one end provide resistance when the bracket is installed. The pin at left is what compresses and holds the spring clips tight.
My caliper is completed!
To keep it looking pristine, I wrapped both calipers in a soft towel and put in a safe place out of the way.
The next time you see these beautiful pieces will be during the mock-up stage on page 16.