1957 Corvette RestoMod Story – Page 5
C4 Front-End Disassembly
The first part of my plan is disassembly of the Grand Sport front-end. I did this early so the suspension cradle could be sent to Newman Car Creations. Newman re-engineered my stock ’56 frame to accept the cradle and C4 suspension components.
While Newman was doing his magic, I went to work further disassembling and upgrading my suspension pieces. All the suspension bushings and ball joints needed replacing. The bushings were in bad shape after more than a decade on the road, and the ball joints were loose and leaking.
When you upgrade your suspension, don’t use old bushings or ball joints.
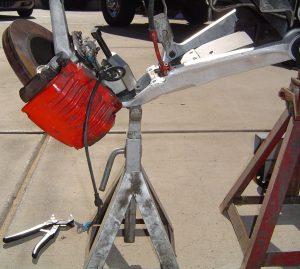
Without having a dolly of any type to hold the front-end, I improvised. At right, the assembly is supported by two jack stands under the cradle. I kept the hoist and chains attached to provide stability – I didn’t want the whole thing to wobble and fall on my foot.
If you don’t own jack stands or an engine hoist, you would be wise to invest in them. The engine hoist can be used for several heavy operations, including hoisting your engine!
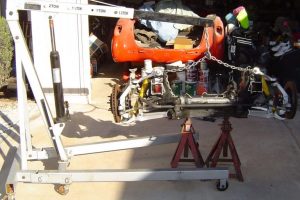
Commonly called a “cherry picker”, the hoist arm is adjustable, and the whole thing folds up for easy storage.
And just like you, I have a lot of junk in my garage.
Once the assembly was secured, I removed the brake line at the caliper. Have a bucket under this to catch the caustic brake fluid that may drip out. Brake fluid will damage paint and other surfaces so be careful handling this stuff.
The wheel speed sensor came off next – make sure you don’t damage the end plug, you may need it later. Front sub-frame connecting brackets were removed. These brackets came off the back of the cradle and bolted to the frame for rigid support. I did not trash these brackets at the time because I didn’t know if I needed them or not. Take off the sway bar and brackets from the front of the assembly and keep them.
Next, I removed the tie-rod ends from the steering knuckle. Once the old cotter pin was gone, I used a tie-rod puller tool to separate the rod end from the knuckle. Maybe a big set of pliers will do this, but be careful not to damage the aluminum knuckle. Aluminum is softer than steel and the serrated jaws of pliers could leave unwanted marring of the knuckle.
This is as far as you can go before dealing with the front transverse leaf spring. It’s made of composite material, and when it’s installed, it contains tremendous energy. DO NOT ATTEMPT TO REMOVE THE LOWER CONTROL ARM OR BALL JOINT RIGHT NOW!! If you do, the spring will snap down on you so hard your children will be born dizzy. Follow my story for the safest way to lessen the spring’s tension.
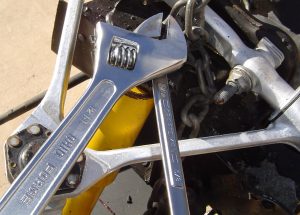
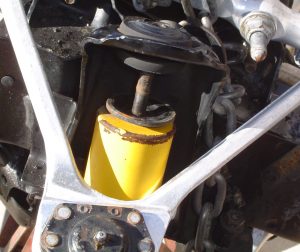
Shown at right is the upper shock mount. The crescent wrench is holding the shock stud while the open-end wrench is loosening the shock nut. Without ever having done this before, this part was scary.
The shock is attached at the bottom to the lower control arm. The leaf spring is supported by the lower control arm valley. I could see that removing the lower two bolts from the shock and arm would allow the spring to rapidly lose tension.
This would thrust the lower control arm downward in a violent way – and possibly injure anything under it including my hand. So the only safe way to relieve spring tension was to unfasten the shock’s top mounting nut – SLOWLY!
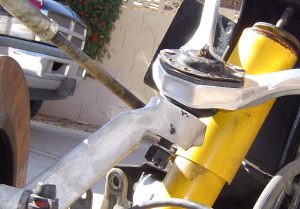
When the upper shock nut was removed, the spring and everything attached snapped down about 2-3 inches. The result was much less tension in the spring, and the lower control arm, knuckle, and upper arm moved downward too.
The upper control arm came down and pinched the shock body (left). DO NOT attempt to remove the shock at this point. There is still plenty of tension in the spring and injury to your hands could result. Read on to see how I did it…
The proper way to relieve pressure on the transverse leaf spring is to use a specialty tool. Made by Kent-Moore, the J-33432 is designed to attach to the spring and relieve the high-energy downward pressure. Once that is done, disassembly of the control arms, shocks, and steering knuckles is easy.
But the specialty tool also has a specialty price tag. I waited three months for mine to arrive and it cost over $700. I recently looked online, and it is now over $1,200! So without the tool, I took the chance that my slow and methodical plan would accomplish the job, and it did. I bought the J-33432 from HandsOn Tools, and I have used it extensively on the rear-end disassembly and both front and rear re-assemblies.
Speaking of tools, you will need a good set of metric sockets and wrenches. The C4 Corvette uses all metric fasteners. Don’t ask me why the icon of American sports cars uses metric fasteners because I really don’t know. Probably has something to do with flexibility of sizes.
I had only SAE type tools, so a quick jaunt over to Sears Craftsman and a couple hundred bucks later, and I had the needed hand tools for this disassembly.
The next step removes the upper control arm from the steering knuckle, attached by a ball joint. BE CAREFUL, THE TRANSVERSE SPRING STILL HAS TENSION IN IT! The upper arm’s ball joint stud goes through the knuckle and is fastened with a nut, washer, and cotter pin. I removed the cotter pin and nut carefully, and used a ball joint puller to separate it from the knuckle.
The reason I know the spring still has tension is when that ball joint was separated, another 2-inch violent jerk downward happened. To be safe, I put another jack stand under the lower arm. The jack stand saved my foot and leg some trauma. The entire assembly lurched and tried to fall off the jack stands, but my engine hoist and chain prevented that from happening. And you thought my setup was strange.
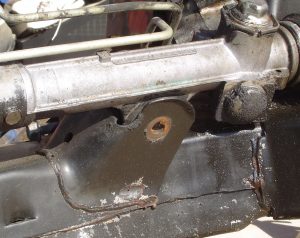
After doing the same procedure on the other side, I then removed the rack & pinion steering (right). This is the hydraulic steering gear, that all modern cars use. The original 1957 unit is indeed a box that has a ball & worm gear that is much less responsive.
Chapter 3 of my book contains all the details of disassembling the C4 front-end including step-by-step procedures, safety tips, tools, bolt sizes, and storage tips.