1957 Corvette RestoMod Story – Page 9
C4 Front Brake Disassembly
A wise old race car driver once said that going fast is important, but stopping is better. I couldn’t agree more.
In this page, I take the front hub assemblies that were removed on page 5, and disassemble them for cleaning and rebuilding. The brake calipers on my Grand Sport are two-piston cast aluminum and are very strong. My 1957 Corvette will be several hundred pounds lighter than the C4 donor car, so these rotor clampers will more than do the job.
The hub bearings are sealed, so if the bearings are bad, just buy another set. Seventy to 80% of braking happens up front, so my brakes need to be in top condition.
Disassembly is straight-forward, but there are critical procedures you must follow to protect the hydraulic pieces from damage.
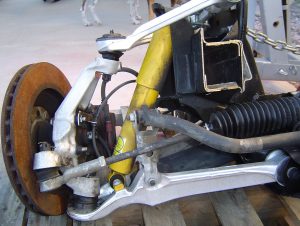
The right side of the suspension is seen here before disassembly. The rusted rotors will be replaced with new slotted and drilled 13-inch ones from Summit Racing. The caliper is not seen, but it’s on the back side of the rotor. The rotor bolts to the hub when the wheels are fastened with lug nuts. The steering knuckle is bolted to the hub bearing. This knuckle is fastened to the control arms via ball joints.
You have already read about replacement of the upper and lower ball joints. New shocks and all new bushings will also be done – those parts were never meant to be “lifetime” pieces.
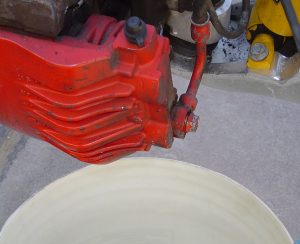
During the front-end disassembly, the brake lines were removed from the calipers. Make sure you have a bucket to catch the brake fluid when it pours out of the line and caliper. This stuff is really caustic to paint – it won’t burn your hands, but it really doesn’t like paint.
Some of you may be thinking the Grand Sport did not have red calipers – they were black. And you’re right! Whoever owned this car painted the calipers red. How do I know? Read on to find out.
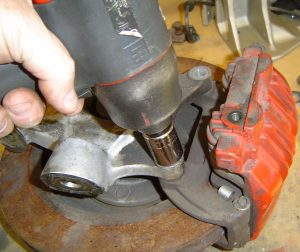
Calipers are bolted to the steering knuckle by a caliper bracket. You can use hand tools here, but you better bring your A-game because they are torqued down pretty well.
I used an impact wrench (shown) to loosen the bolts, then a socket & ratchet to remove them. Impact wrenches are powerful and can sometimes gall bolt threads due to heat buildup when the bolt turns very fast. Don’t act like you’re in NASCAR, take care of the parts you’ll need later on.
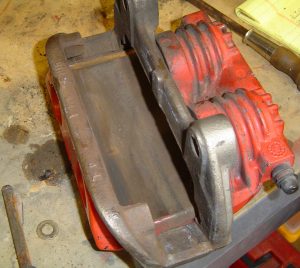
With the caliper bracket bolts removed, a retaining pin (lower left in photo) is also removed. This pin is held in place by an E-clip, and the pin secures the bracket to the caliper and pads.
The caliper is a wonderfully simple hydraulic mechanism. The two “humps” on the right are the caliper piston bores. When the brake pedal is depressed, brake fluid is pressurized and pushed through the lines to the caliper pistons. The pistons are pushed outward to make the inner pad contact the rotor. The caliper then slides until the outer pad also squeezes the rotor – and the car stops!
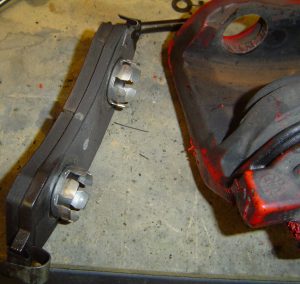
Picture left is the outer brake pad. Note the outer prongs that fit into the outer caliper housing.
Even though there is plenty of pad wear left, I’m going to replace these pads. Old pads are prone to cracking under the intense heat and pressure of braking – and I’m not taking any chances.
I will also rebuild the calipers with all new internals (Autozonehas a great rebuild kit). I’m not quite sure how to do this yet, but I do know that the piston and walls of the caliper cannot be even slightly damaged in any way – or, I’ll be buying new ones (no budget for that!).
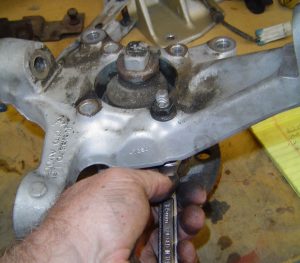
With the caliper removed, now you can remove the steering knuckle from the hub. Again, my impact wrench was used on the nut, while a box-end wrench held the bolt from underneath.
I can’t stress enough to be careful around the cast aluminum parts. Bumps and scrapes that wouldn’t affect steel can put nasty gouges in the C4 pieces.
If I remember correctly, the knuckle’s arm closest to my hand is the tie-rod connection. The left arm is for the upper ball joint, and the right arm the lower ball joint. All of these contribute to the ride and handling of the car.
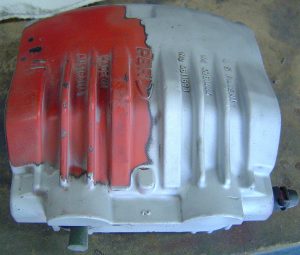
See, I told you the calipers were painted. Here, I media blasted half of the caliper, and you can see along the blast line the original black power coat.
My plan is to bring these back to black using high-temperature caliper paint from Eastwood. Black calipers go much better with the theme of the car – but more on that later.
In the lower left of the photo, a green rubber plug is preventing any media from getting inside these important hydraulic brake parts. Lower right is the bleed screw covered with a dust boot.