1957 Corvette RestoMod Story – Page 2
RestoMod Plan & Upgrades
It took me a while to understand that you never want to start a project until you know what you want the car to be. I want my car to be safe, reliable, and a performer – and yes, look amazing too.
To achieve this, all mechanical parts of the car need to be upgraded. Let’s face it, the technology of the Corvette in the ’50’s was first used by GM in 1949! That was cutting edge then, but it won’t cut it now.
But the look of the ’57 Corvette, I mean the car is eye-catching and beautifully styled. Thirteen teeth in the grill and two headlights (the last year for these), sexy curves, and whole bunch of style.
So for the upgrades, I chose the era of Corvette that is both great in performance and relatively affordable – the C4 era. Specifically, the 1995-96 years. Read on for the details.
Here’s my 1996 Grand Sport front-end assembly. Except for a couple of dings in the aluminum lower control arms, it’s in good shape. The rack & pinion steering gear needs replacing, new bushings and ball joints, new rotors and shocks – and this baby will be ready to rock.
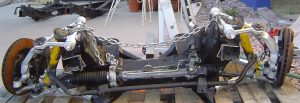
You can see where the frame was cut to remove this assembly from the donor car. In the above photo, just below the upper control arm pivot is where the cuts were made. This frame rail contains the upper shock mount as well (between the upper control arm wishbone).
Also bolted to the frame is the cradle. The cradle is what most suspension components attach to. The cradle will be fastened between my ’56 frame’s two side rails. The rack & pinion steering gear is bolted to the front of the cradle and can easily be seen above.
Well, I needed to disassemble all of these parts and get the cradle to Newman Car Creations. What Paul did is weld new front forks and brackets to my 1956 frame, he then bolts the cradle in place. This type of re-engineering is best left to the pros.
See Chapter 3 of my book for a complete description on how to disassemble this C4 front-end. Chapter 4 details how to rebuild the front brakes and calipers; and Chapter 5 goes into depth on how to replace all bushings and ball-joints.
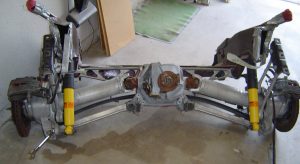
Here’s the 1995 Corvette rear assembly. It’s in very good condition as well. You can see where the donor car’s frame was cut to remove the assembly – red shop rags are duct-taped to the sharp protruding ends.
Newman welds all new brackets to my 1956 Corvette frame to accept the components. This assembly was from a 1995 automatic with front-end damage.
The wrench in the lower left of the photo is on the lower shock bolt. Newman’s need both of these as he welds a tab on each. This helps to re-position the rear sway bar end links. Chapter 11 shows how to test fit the rear suspension.
Chapter 6 of my book, 1957 Corvette RestoMod, instructs on how to disassemble the C4 rear suspension. Chapter 7 covers the complete rebuild of the C4 rear brakes and calipers; and Chapter 8 details how to replace all rear bushings and universal joints.
The carrier for the 1995 Corvette automatic convertible used a very high gear ratio – 3.07:1. In gear-speak, the lower the ratio the higher the gearing. This is great for automatic transmissions and makes a swell road car.
But I want a little more “grab” in first and second gears, so this Dana 36 will be upgraded to a 3.54 ratio. I found a source, Just Differentials, and my work can be seen on pages 14 and 15. I rebuild the “pumpkin” myself to keep as much of the project my own work – and save on high labor costs too.
Chapters 9 and 10 of my RestoMod book have complete instructions on how to rebuild the Dana 36 Carrier and Differential (called the Case). And the chapters are packaged if you need both.
Next, we’ll look at the frame. You will see about my unfortunate choices, a scary purchase, and an expensive mistake I made. But it all came out okay.
I’m back on the road (so to speak) to making my dream car build a reality.
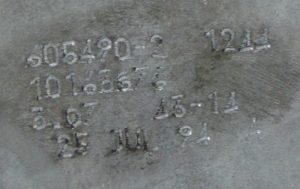
This is a close-up of the casting numbers on the axle carrier (the “pumpkin”). The top left number means it is a Dana 36. Below that is the GM part number. At bottom is the casting date, which shows this was made during the 1995 production year. Above that is the gear ratio – “3.07”. Next to it is the ring & pinion tooth count. Divide pinion into ring and you get 3.07.
I plan on rebuilding the entire unit and installing 3.54 ratio gears.
Stay tuned, I heard rebuilding a differential is difficult if you don’t know what you’re doing!